Time spent at home actually feels like more work. I find myself paying more attention to emails later into the evening, or answering the office line on weekends. The line between work and home is quite difficult to discern when my kitchen table falls firmly in both places currently. Working too much – and liking it – may be a character flaw. My besties informed me I’m simply not trying to relax and draw that line in the sand. Thoughts?
Considering the hustle, and the need to keep a tight grasp of our budget (because, when living with 3 picky roommates, it’s easy to give in to ordering takeout – especially during a global pandemic), I’ve been diligent about my kitchen creativity.
Along with the creativity came the need to customize my lengthier recipes to better suit my new “living room/office” style. Plus, I want to be able to use these options when I actually go back to the office. Quick breakfasts have consistently been a sticky topic for me. I am a firm believer in waffles and bacon and fluffy eggs – and well, all those delicious bits take time. So, here’s the benefit of reading this recipe: It’s quick, easy to grab and go, and always tasty!
What you’ll need to feed 2 hungry adults:
Ingredients – 1 can of refrigerated crescent dough 4 eggs 6 slices cooked bacon 4 slices of provolone cheese (or any other sliced cheese of your choice) 2 tablespoons fresh chopped basil or Italian parsley Salt and pepper (to taste)
Now to Prep & Bake!
Preheat the oven to 400°F. Open and unroll the crescents onto a parchment paper lined baking sheet. Split each sheet of dough right down the seams, so you have a total of 4 medium rectangles of dough. Pinch together any open areas in each square to seal the dough.
Lay one slice of cheese on each sheet of dough. Place the bacon slices around the edge of the dough (at the border). You may have to cut the slices so they’ll fit better along the edges. These slices work as the border to help keep your eggs from rolling onto the pan, so make sure to place them well and firmly on the dough.
Crack one (or two, if you’re extra hungry) egg into the center of each dough rectangle. Sprinkle the egg with a smidgen of salt and pepper.
It’s just as easy as this lady ^^ makes it seem.
Bake these little egg basket crescent rectangles in the oven for 10-12 minutes, until the edges of the dough are golden brown and the eggs are cooked to your preference. I’m a fan of the slightly runny yolk, so 11 minutes and 30 seconds is my happy place. Over 13 minutes, and you’re looking at an over-hard option.
Once out of the oven, garnish your egg baskets with basil or parsley just before serving, and enjoy!
I added dill and red pepper flakes to this version. Feel free to change up your garnish!
Serve this breakfast dish with a cup of your favorite fruit and a hot latte. I’ll be sure to add my own fave coffee recipes, soon!
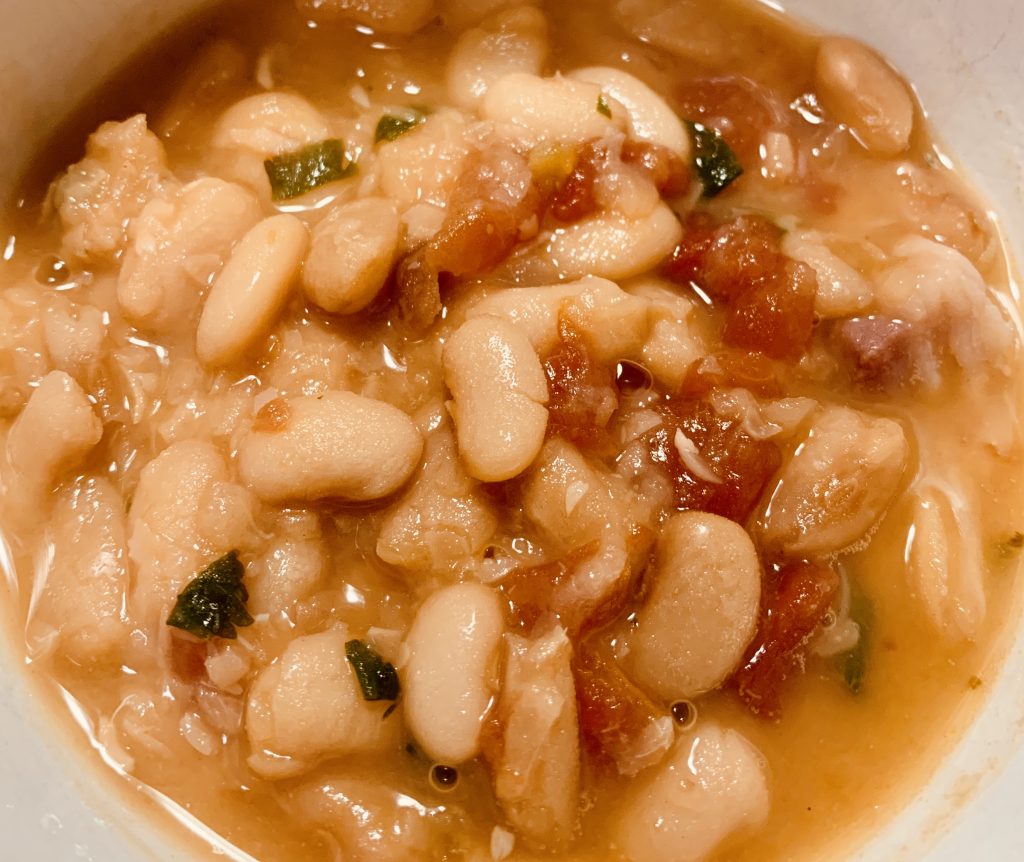
Growing up in Deep South Texas meant lots of delicious comida Mexicana. Vibrant colors and rich flavors are a way of life along the border towns of the Rio Grande Valley, where everyone enjoys the combination of Texas charm and latin influences.
At an early age, my grandmother taught me to make frijoles a la charra. It’s such a simple recipe that, after all these years, I’ve only changed it once — and that was to make it spicier.
First things first, here’s what you’ll need to make 1 pound of frijoles.
STEP ONE: CLEAN THE BEANS
If you’re like me, then I’m sure you shoved your hands in a barrel of frijoles as a kid. Watching other people do this at the grocery store is the main reason why I always wash the frijoles! You must do this, too.
My Memo made me focus in on this task. It was one helluva way to keep a kiddo busy – especially when prepping the beans for a large BBQ or family dinner.
Clean beans taste better. It’s as simple as that. You can tell if someone simply dumped a bag of beans into a pot because the impurities will show up – and let me just say this: no one likes piedras (rocks) in their frijoles. That’s just gross.
Cleaning beans is not difficult. Carefully pour the pinto beans onto a clean countertop or table. Then, sort them apart in a section at a time. It’s not an exact science. The aim of this method is to separate the broken half hulls, any funky looking bits, and any potential rocks (yes, rocks) or sediment that may have ended up in the package, from the beans you plan on eating.
Make sure to separate them out a few at a time, careful to set aside the unsuitable ones. Sweep all the favorable ones into the colander or strainer. This entire process should take about 5 minutes for one bag of beans. Don’t worry if you don’t get it done this fast – this takes practice. Here’s what those fractured pieces look like:
Once you’ve placed the beans you plan on eating in the colander, make sure to run them under cold water. If you have time, I recommend rinsing them thoroughly – gently swishing them around under the running water for about 3-4 minutes.
Then let them soak for 4-12 hours. My grandma is a big fan of soaking beans overnight. Soaking them removes some of the sugars in the beans, making the cooking process much faster. However, your overall wait time is obviously much longer. I tend to only do this if I’m making beans for a large group, as it helps with the prepping and planning.
Since I have no self-control, I prefer to have my beans now! Which means I don’t typically soak them. I mean…they’re delicious, and I can eat them with so many tasty main dishes. So, why wait?They’ll cook in about 2-2.5 hours, depending on how long you need them to simmer to perfect softness.
Let’s Get Cooking!
STEP TWO: CUBE THE SALT PORK
The secret to the best beans is salt pork. I know plenty of recipes that use bacon – which is still super tasty – but the best beans use salt pork. HAnds down. Salt pork is salt-cured pork. It is usually made from pork bellyand typically looks much like an uncut slab of bacon, but is fattier. All this means is that your beans will be packed with FLAVOR!
Cube the salt pork into half-inch chunks. Leaving them bite-sized makes the flavor bombs much easier to eat. Add the salt pork pieces to the pot. Personally, I like to use a spaghetti pot, this way I don’t have to worry about any boil-over. Set the pot on a burner, turning the heat up to about medium high.
Feel free to cook the pork down just a bit (sauteè the pork until the meaty chunks begin browning, or the aroma in your kitchen becomes heavenly), — this extra step will add more tastiness to your beans.
STEP THREE: COMBINE INGREDIENTS!
Once the beans are thoroughly rinsed and drained, transfer them from the colander to a large pot, along with the 12 cups of water. While the water comes up to a boil, dice your large onion (or two) – which should yield approximately 2 cups. Helpful tip: You can purchase diced, frozen onions instead of chopping a fresh one!
Add the onion to your pot of beans. Then add the can of habanero Rotel. If you don’t like spicy foods, you can forego the habanero peppers and simply choose a can of classic Rotel. The original Rotel adds great flavor without the spice. If you want to kick it up a notch, combine the habanero Rotel and a diced jalapeño pepper (or two), to the pot [depending on your spice needs.]
Finally – add the two bouillon (I used Knorr consomate) cubes.
Pro Tip: Start with 1.5 cubes and then add the last half after tasting the finished product (you don’t want beans that are too salty.) If it’s a bit too salty, you can easily add half-cup increments of water to reach your desired taste.
Stir everything together and get the mixture up to a boil. Then, drop the heat to a simmer, medium/medium-low heat. Continue simmering the frijoles for another 2 hours, stirring them occasionally.
Taste the frijoles after simmering for two hours. Once soft, the beans are ready to eat. If they’re not quite tender yet, then let them simmer for another 15 minutes or so. Feel free to add salt or pepper to taste. Just before serving, set the frijoles to low and stir in the cilantro – roughly chopped.
Violà! There you have it. This recipe is a family favorite. The hardest part of making this dish is the wait time to eat the frijoles! On the plus side, once you get everything in the pot to cook, you’ve got plenty of time to work on a main dish or other side dishes. YUM!
As an added bonus? You can freeze cooked portions of your frijoles for 2-3 months. WOO!
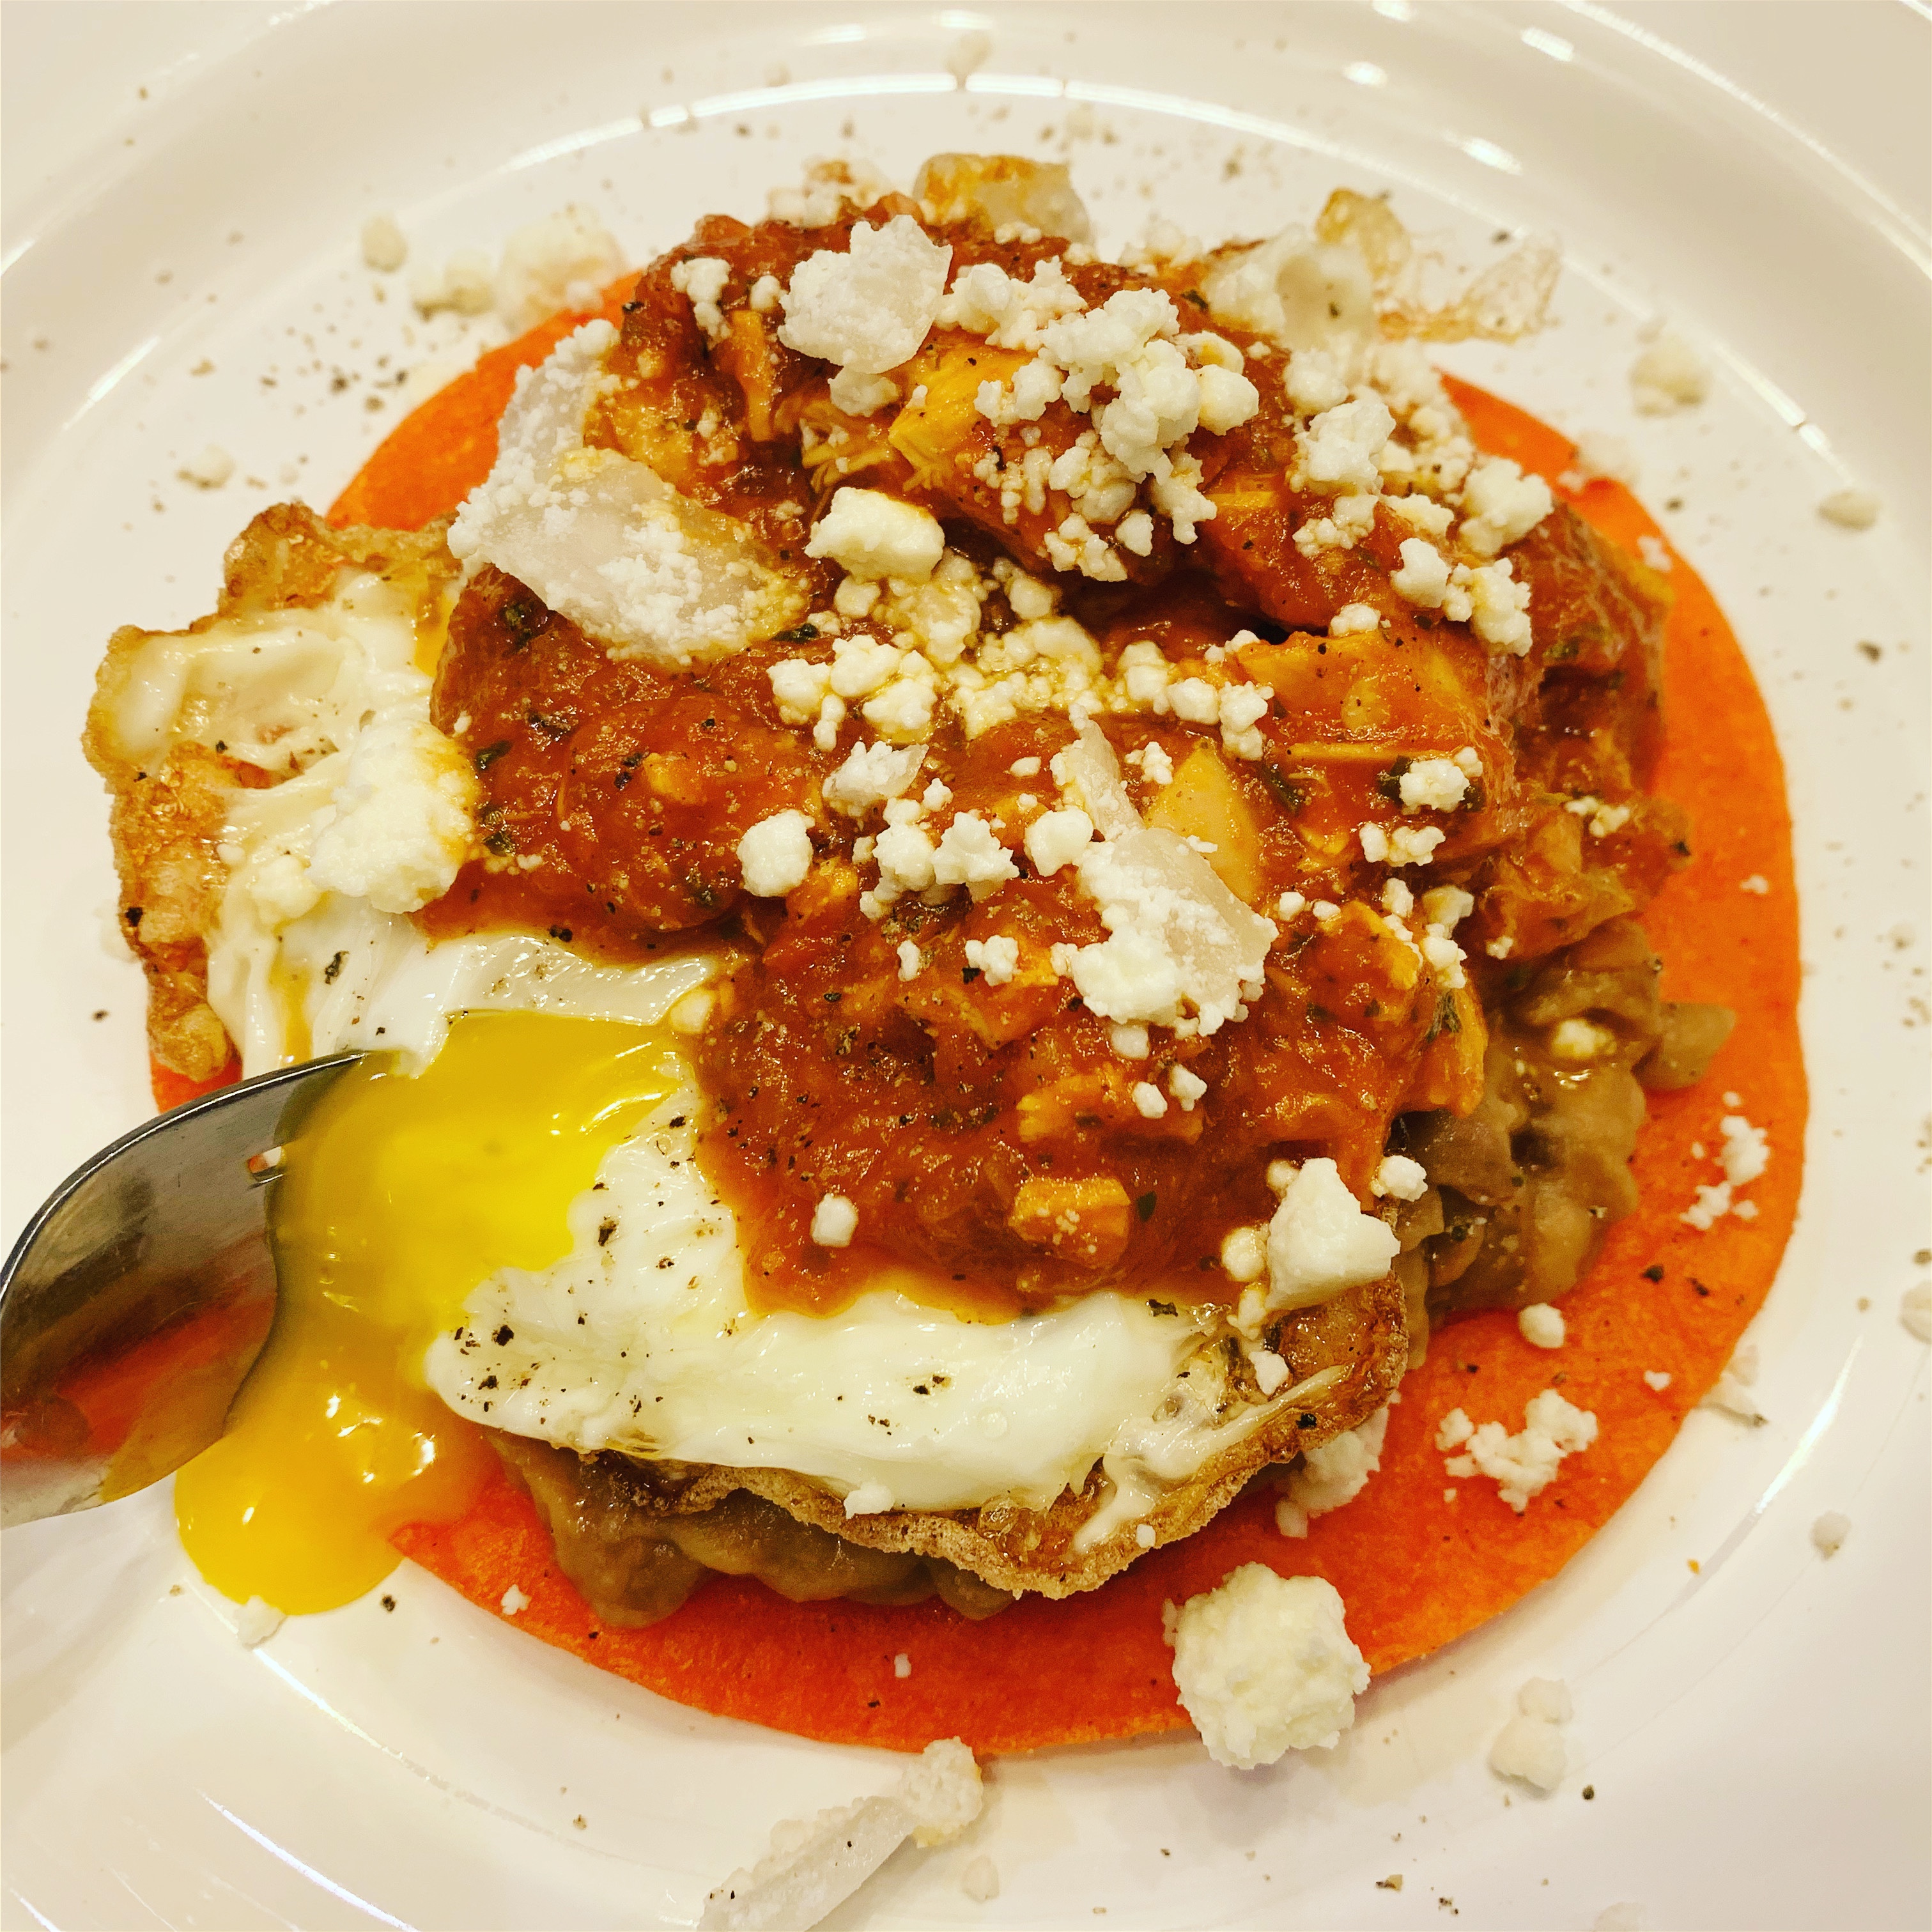
Frijoles are great any time of day. I especially love pairing them with fideo (Mexican vermicelli dish, below), entomatadas (red tortilla dish, below), and calabaza con pollo. My absolute favorite complementary dish? My own version of “mexican breakfast” which is the image that caught your attention to get you here. 😉 See? So many options!
Frijoles are versatile and happen to be a staple in many latin households. I hope you love them as much as I do. Let me know what you think of this recipe.
Rolling out of bed and getting the day started is not as fun when the Texas weather refuses to pick a season. This past week brought temperatures ranging from 28 degrees to 70 degrees. With classes in full swing, the motivating factor to get me up and at ’em is the withering stare I’d receive from my morning professors for interrupting their classes. [There’s really not a whole lot worse (class-wise) than ending up on a professor’s sh*t list.]
I’ve tried to think up creative ways to get me out the door faster, because having two doggos makes it quite difficult to leave home (and the snuggles) for Business Law. In an effort to be more focused (and work toward accomplishing these goals), I started meal-prepping both breakfast and lunch. It’s not as massive of an undertaking as you might expect. I figured I was spending about an hour and a half, each day, cooking and eating dinner. Most days, I was forgetting to eat breakfast or, in a more costly fashion, simply picking up a muffin with my morning Starbucks coffee run.
In case you’re keeping track, that’s $1.95 for a muffin + 4.45 for a caramel macchiato.
On mornings where I was running late, I spent an average of $7 each morning. Habitually late weeks meant an added $30 expense for the week, just for myself. Add in the Fiancee (who usually commutes with me), and that expense is now double. I’m not saying the occasional splurge is bad, instead, I’m suggesting a re-prioritization of expenses. Between the time-suck and the over-spending, I found myself frustrated…deliciously warm with my “christmas-in-a-cup,” but still, not entirely pleased.
Deciding I’d rather use my weekday evenings to relax a bit, or ::gasp:: read/prep MORE for class, it made the most sense to add a breakfast prep to my Sunday routine.
Enter: Overnight Oats!
Picture courtesy of J. Ezell, a fellow classmate with a love of Oats.
This recipe is super easy to follow, or even customize for other add-ins. I make a large batch on Sunday, and it usually carries us through to Thursday morning. This recipe makes about (10) 1.25cup servings. Both the Beau & I just grab one container each on our way out the door, and I tend to eat mine during class. My professor’s don’t seem to mind, and it actually helps keep me engaged in the lecture. How often do use snacks to keep you focused?
What you’ll need: 16 oz. of oatmeal, steel cut is a good option. Just do NOT get instant!
5 cups of milk (I use 1%, but you could opt for your favorite almond or cashew milk)
2 teaspoons of vanilla
8 oz. of raisins (or another fruit option of your choice)
½ cup of white sugar, if you’d like sweeter oatmeal
— Note: Use 2 smashed bananas instead of the sugar for a natural sugar substitute!
1.5 teaspoons of cinnamon
¼ cup of chia seeds
Directions 1. Pour all ingredients into a large mixing bowl.
2. Mix the all ingredients in a large bowl.
3. Portion out 1 cup to 1.25 cup servings
4. Place in refrigerator, leave overnight.
5. Eat cold the next morning, or microwave for about 90 seconds.
I am currently in love with apple+cinnamon, blueberry+banana, and cinnamon+raisin overnight oats. These breakfast meals are ridiculously easy to prepare, and even more scrumptious to devour!
Now you have more time to dance in your undies be a serious adult in the morning and get lawyering stuff done! You go, Glen Coco!
I started the semester with a crazy-need to organize everything. My meals were out of whack, and you know how muchI prefer organization over chaos. That said, I decided to meal prep for an entire week! I thought it would be best to post a new “Law School Eats” series! Most of the meals cost around $3 per serving, make at least 4 servings, and they are so easy to prepare!
Need a 30-minute meal? This is a great go-to on a cold winter’s night. Flavorful. Scrumptious. Just what you need if you’re missing some great home cooking.
Ingredients:
1 rotisserie chicken, roughly pulled and chopped (grab one at your local deli!)
2 tablespoons olive oil
4-5 calabaza squash (zucchini works too!), cut into cubes (remove stem and end)
½ jalapeno, sliced (add more if you like the extra spice)
48 oz. of chicken broth
1 cup of water
1 can of Rotel (mild)
1 teaspoon garlic powder
1 teaspoon dried cumin
1 teaspoon knorr tomato bouillon, chicken-flavored
salt & pepper, to taste
[Prep your ingredients!]
Directions:
1. Use 1 large soup pot, add olive oil.
2. Add the Rotel, sauté for about 1 minute.
3. Add the chicken pieces and shreds to the pot, stir.
4. Chop the zucchini in bite-sized pieces. Add them to the pot.
5. Pour in the chicken stock.
6. If you prefer a bit more soup, add in the 1 cup of water.
7. Bring to a simmer.
8. Add in garlic powder, cumin, knorr, salt, pepper, and sliced jalapeno.
9. Simmer for about 15 minutes, or until Calabaza is fork tender.
10. Serve yourself a bowl (or two) and enjoy!
11. You can store the calabaza dish for up to 1 week in the fridge, or three weeks in the freezer. This recipe makes for easy meal prep!
I rarely get to post recipes anymore. This cheesesteak post was a long time coming, too. I made these for the Beau and his besties for boys night a while back. They gave rave reviews and demanded I make them again soon.
These Philly cheesesteaks are so easy to MAKE!
They’ll taste like they took forever, but you’ll have them on the table in under 45 minutes.
Truly, the majority of the time goes into the fact that this recipe makes 2 entire 8×11 pans worth of buttery goodness.
What You’ll Need: 3 lbs. of shaved rib-eye (ask the butcher to shave it, this way you cut down your prep time)
3 large green bell peppers (slice, about 1/4″ thick)
2 medium-sized onions (thin slices)
1lb. of Provolone Cheese
2 packages of Hawaiian Rolls (slice horizontally to separate tops and bottoms)
Salt & Pepper, to taste
1 stick of butter, halved.
1 T of Olive Oil
Alright. Prepare yourself.
The Cooking Part:
Preheat the oven to 350 degrees
Add the oil and half 1/3 of the butter stick to a large pan
Add the shaved rib-eye to the pan + the salt and pepper (I add about 1T of each)
Brown the rib-eye, then remove it from the pan and place it in a bowl; KEEP the pan drippings in the pan though!
Add onions and bell peppers into the pan that has the drippings, sauté until soft
Place the bottom halves of the Hawaiian bread into two separate baking pans
Melt the other 2/3 of the butter and brush a light coat onto the Hawaiian bottoms
Lay down a layer of provolone cheese on top of the brushed Hawaiian bread
Add a layer of the ribeye, distribute evenly
Distribute the onions and bell peppers evenly over both pans (make sure to include the drippings!)
Add another layer of Provolone cheese.
Place the tops of the Hawaiian buns over the glorious feast you’ve already assembled
Brush some more butter over the tops
Pop them in the oven for about 10 minutes, or until tops a crunchy golden brown
Yes, you can swoon over me….and the amazingness you are about to devour!
You should probably avoid pretty much anything I stress bake.
That’s right, I stress bake. Here’s a quick little reminder for you guys who are not aware of my sordid love affair with decadent chocolate cake and anything bathed in a creme.
I mean, come ON! How are you not salivating? You see, I have a real love and passion for food. I wouldn’t say I’m as adventurous as Andrew Zimmern, but I do enjoy tasting new and interesting foods – especially when they both smell and look delish!
During midterms, I baked double dark chocolate brownies, some with a hearty layer or mint chocolate; plus there were chocolate chip oatmeal cookies, waffles, and capellini with homemade marinara! Should I have been studying? Probably. Did I need the brain-break? YES.
Once I got through the thick of exams, though, my brain kept re-thinking the exam questions and trying to remember my answers. I re-lived new hypos (hypothetical questions and scenarios on the exam), trying to see if I could apply the law to my own ideas.
Note: You should really avoid this kind of cyclical and tedious behavior. It’s not good for you and ends in tears. Trust me.
I ended up getting myself worked up and decided I needed something to focus on, so I dug deep into my belly and decided that what my little heart craved most was capirotada.
I know – what in the ever-loving tort law is capirotada?
Capirotada is a Mexican Bread pudding that is traditionally eaten during the lenten season. One of my Tias (Aunts) is an absolute expert at all things Capirotada and I decided to make my own recipe, inspired by her yummy treats and hilarious jokes.
I guess you can say law school has me feeling all sorts of ways and I needed to re-ground myself. Clean the slate. And, erm..avoid studying for contracts just a bit longer.
Here’s what you’ll need:
Vanilla (I used Mexican vanilla, but I’m not convinced that another form of liquid vanilla would taste too different)
6-7 bolillos (small french bread like loaves, usually found in the bakery of your local supermarket)
2 cups of water
2 piloncillo chunks (piloncillo is a Mexican Brown sugar, packed tightly and in a small cone-like shape about the length of your hand)
2 cinnamon sticks
6 eggs
4 star anise flowers
1 can of sweetened condensed milk
1 cup of milk
1 cup of raisins
1 cup of cheddar cheese
1/2 cup of pecans (I picked up some candied pecans, and will not justify this delectable choice)
Steps:
Preheat oven to 350 degrees
Grease (use butter, vegetable oil, or cooking spray) a 9 1/2″ x 13″ pan. Set aside.
On the stove, place the piloncillo, star anise, cinnamon, vanilla, and water into a pot and simmer the ingredients until the piloncillo is completely dissolved and reduces by about a quarter. [This is the step where your house starts to smell like Christmas and all things wonderful and warm!] Set aside for about 20 minutes to cool.
Cut the bolillos into bite sized cubes. Set them in a large mixing bowl.
Take the star anise and cinnamon sticks out of the syrup.
Scramble the eggs in a medium sized bowl. Carefully and slowly, add the cooled syrup into the egg mixture. Scramble again. [You should add the syrup a couple of ladel-fulls at a time.]
Once the eggs and syrup are combined, pour half the mixture over the bread.
Add half a cup of cheese, half a cup of raisins, and a 1/4 cup of pecans. Toss gently to combine the ingredients. Transfer them to the pan.
Repeat step 8 with the rest of the raisins, pecans, cheese, and syrup.
Now you place the casserole dish into the oven and bake, uncovered, for 20 – 30 minutes, until the top is slightly brown.
While you’re waiting, you can make the glaze!
Whisk the condensed milk and half a cup of milk in a small bowl. You can use less milk if you want a thicker, creamy glaze.
Once the capirotada is done, pull it out of the oven and pour the glaze over it.
Feel free to serve yourself a heaping slice with a nice glass of milk. You can eat capirotada cold or warm, but I’m pretty sure it’ll be gone before it has time to cool off.
If you’re feeling like a daredevil and not counting any calories at all…you should try this with a small mound of vanilla bean ice cream. Oooooh!
Last week I decided to delve into the sumptuous world of white wine creme sauces and angel hair pasta.
I’d seen a pin several weeks earlier and jumped at the idea of making diver scallops. Yum, right?
It was finals week on campus, meaning my teacher-self was off at 4pm, instead of 7:30pm. Oh, what glorious times they were! I used my short burst of freedom to mosey into Central Market, a.k.a. – Crowned Prince of All Things Food. All I had was this picture:
Of course, my mouth was saying –
I wanted to start this blog year by sharing this amazing recipe, which I pieced together on my own, from a Pinterest dream.
Here’s what you’ll need, to make 4 [awesome] servings. Less, if you’re feeling totally ravenous.
1/2 cup of White wine – pick a bottle of something you already love. Choose a slightly drier wine, for a stronger taste. I used a Pinot Grigio, standard – because I’m not a wine officionado of any kind, and the foodie at CM said this particular one would do the trick for my dish. Please do NOT use cooking sherry, unless, for some unholy kitchen reason, you love it. Wondra flour – 2-3 teaspoons, depending on how thick you like your pasta sauce Dill – to sprinkle on your scallops Diver scallops – 12 in total, at room temperature and patted dry with a paper towel! You can use more than 12, if you’d like of course. Old Bay Seasoning – Again, fairy dust for your main hoorah! 1 cup of Heavy Whipping Cream, because we need the calories in this dish to sink straight to our gooey places 3/4 pound of Angel Hair Pasta, cooked to your liking. I strive for two minutes past al dente. 1/2 cup of diced shallots
1 cup of sliced cremini muchrooms
2 cups of broccoli florets 2 tablespoons of chopped garlic olive oil, 2 tablespoons. Butter, 3 tablespoons Salt & Pepper to taste.
Cooking Instructions:
1. Take out a trusty pan, one that doesn’t cause you to scream out “Why did you murder my omelette?!” and grease that puppy up! By this I mean, add the Olive Oil and Butter. Heat the pan to medium heat. You can also begin to boil the water for your pasta at this time. Don’t forget to start your pasta!
2. Slice or dice your shallots. 1/2 cup is enough, but you most certainly can add a bit more if you like the onion-y taste. :]
3. Toss the shallots and chopped garlic into the melted olive oil + butter medley. Sprinkle in a dash of salt and pepper. Let the flavors collide until the garlic begins to brown. Be careful not to BURN it. [That will taste gross. No, no, no. Love your work. Watch it carefully!]
4. Get your scallops, Dust them with a shake (2 teaspoons split) of Dill, Old Bay, Salt and Pepper – On EACH side. I forgot to do the second side, so I quickly fixed them.
5. Place the scallops gently into the heated pan, and sear them for 5 minutes. Turn down the heat to medium low. Turn all the scallops over. Add in the white wine. Cover the pan for 5 minutes.
6. Remove the scallops and place them on a plate with a paper towel.
7. Slowly stir in the heavy whipping cream.
8. Add the Wondra. If you want a thicker cream, add more until you reach your desired consistency.
9. Add in the mushrooms and broccoli. Add salt and pepper, if need be.
10. Drain your pasta, as it should have been cooking during this time.
11. Add the scallops to your white wine butter sauce.
12. Place a bed of pasta on your plate, add three scallops and the broccoli+mushroom dream sauce.
Voila!
Enjoy the NOMS! I hope you’re ringing in the New Year with something delicious.
Just the right amount of capsaicin cheese, eh? [Credit]Chile – you may know it as a country or the little devil peppers that intimidate tomatoes in a mean salsa.
Last week, the beau happened across a coworker eating Chiles Rellenos, stuffed peppers, and decided I must make them for him. Talk about hellacious!
I’d never made chiles rellenos, mostly because once you fry a pepper, the wonderful crunchiness gets blown away. The chewy, damn near rubberized mess, kind of grosses me out.
Should I keep down-selling peppers?
The pruny-esque poblano can hold a wallop, especially if boiled and softened first. Don’t let their light weight deceive you!
I lurve the spicy, earthy flavor a pepper delivers, but I prefer them freshly diced and in some pico!
Despite all my raw emotions for this particular ingredient, I refused to go belly up on this one!
I busted out the KitchenAid stand mixer to whip the egg whites until a hard peak formed, but make sure you do this last. You don’t want the egg whites to sit too long and get goopy. [Tidbit to you – don’t forget to use the whisk. I used the paddle attachment for about two minutes, and then realized I’m a dummy.]
Next, I sliced open the poblanos. NOTE: If you prefer the mushy goodness that most of the Latino/a population devour, then you’ll want to soften the skins by boiling them for about 2 minutes or grilling them on a hot skillet/griddle until the skin starts to blacken.
Don’t fret – you’re not going to eat the pepper covering in this scenario, so it can get charred. It’ll make the removal process easier. I highly recommend letting them cool for about 15 minutes (or until you can comfortably handle them without burning yourself) and use cool water to help you peel them.
Out came the ground beef,Sazón, salt, pepper, chicken stock, Worcestershire sauce and A1. Mix well and brown. Toss in a can of mixed vegetable and voila! Your stuffing is done!
It’s time to STUFF the peppers!
Gently spoon a couple of pinches of Monterey Jack [or whatever cheesy deliciousness suits you] cheese into each pepper. [I hope I don’t have to tell you that these peppers, and any other fruits/veggies you prepare must be washed and, if you wish, dried before consumption.] Be careful! You don’t want to rip open the pepper.
You need the pepper to close at the seam. Spoon the filling into each pepper.
Coat the engorged poblano into egg yolks.
Dredge the pepper in a thin coat of flour.
Dip the pepper into the egg whites.
Now you’re ready to FRY the pepper.
Hand to the scientific food genies, frying foods is not my forte.
I’m pretty terrible at it, so – for this part of the process – I grabbed the beau to play his part in my kitchen.
This is where my PSA comes in:
USE TONGS! We nearly set the kitchen on fire. We actually started a small grease fire when the poblano took his fate in its own hands and leapt into the vat of oil. The grease popped out, the flames went up, and the beau – never lost his cool. The flame went out quickly and the frying continued. He got better as we went, slowly lowering the peppers into the oil with the tongs – versus laying them down in the oil by the stem. The latter process is highly unreliable.
We fried the peppers for roughly 3 minutes and then pulled them out to cool on a paper towel covered dish.
I forgot to put the pinto beans in the crock pot this morning, making this a one side-dish show.
Unfortunately, rice’s partner in crime did not make an appearance tonight.
Instead, I diced up a quick salsa with my Ninja chopper. Chips and salsa? Always a winner!
These were just the right amount of veggie to beef, and with a wonderful crunch.
No wilted peppers here, ladies and gents.
Just delish! Try them for yourself.
Much love,
CerebellumChef
Note to my readers: I do no receive any form of payment for reviewing products. I have linked the kitchen gadgets and ingredients found here to give credit to those companies and so you may know what I use to make these dishes. If interested in having me review a product, please follow up here.
I know! I’ve been away for a few weeks. I’m so very sorry, my fellow foodies!
Life got super hectic! Finals for my students, weekend trips, planning for conferences, planning for graduate school, quality time with my broskis. No worries, though – I’m BACK!
I’ve got so much to fill you in on: New restaurants, new recipes, and an almost-bug-eyed worthy moment when I tell you about my first Vegan cooking experience. Yep, vegan! Nope, we are not going the full-Monty with being Vegan. We’re simply just not that disciplined, plus – we heart us some meat!
My friend Ashli introduced me to a great vegan bakery in Dallas, more on that little gem later.
I ordered the “Ate layer” burrito and have since (as in, for three solid weeks) been craving this decadent cacophony of flavors. What’s even better? You can choose to eat this vegan, or not. The beau wanted chicken, so we added some.
Here’s what you’ll need:
olives
black beans (canned or fresh, it’s up to you – following the instructions on the bag if you decide to make them yourself)
quinoa (we used a red bulgur mix)
whole wheat wrap or tortilla, for taco versions
avocado
tomatoes
jalapeños
cheese (NOTE – most vegan cheeses are made with nuts, so be careful if you have allergies!)
mayonnaise
Siracha sauce
chicken tenders, if you want more protein (or can’t seem to go one meal without meat)
Seasoning for your chicken, we used Woody’s Cinnamon Chipotle Rub
Step 1: Slice & Dice Dice your vegetables and spread them onto a cutting board. This makes building your tacos/wraps so much faster, getting the yumminess in your mouth tons faster!
One beefsteak tomato, one avocado, and 3/4 of a jalapeño pepper.
Step 2: MEAT, baby! [If you’re making these meatless, then skip this section]
Pour 3 tablespoons of the dry seasoning (of your choice) into a gallon-sized plastic bag
Add 1.5 pounds of chicken tenders and seal the bag. — We used tenders for portion control.
Shake well to coat each tender thoroughly.
Spray a pan with non-stick cooking spray and place on a burner set to medium-high heat.
Place the strips in the pan and cook them for about 3 minutes on each side.
Once cooked through, remove the chicken tenders and place them on a cutting board.
Let them cool for a few minutes while you start putting those tacos together!
Slice them in half and place one half-strip into one taco.
Step 3: The Sauce In a small bowl, mix 2 tablespoons of Siracha with 3 tablespoons of Mayonnaise. This is a bit more on the spicy side, so if you want it creamier – add more mayo.
Step 4: Building Tasty! Using wraps means you can either heat up the tortilla, or not. If you’re using tortillas from a pack, you definitely want to heat them up. They taste better!
We served two tacos per person. Heat up as many as you need, but let me say this – two is plenty!
Once you’ve got the taco on your plate, you can start building.
Add ingredients in any way you choose; a bit of everything. Don’t forget the sauce! Your finished product should look something life this:
Drooling? I certainly hope so! Go make some!
These tacos were super easy to make, and on the table in under 25 minutes! Two of these southwestern delights come out to about 450 calories. No need to feel guilty about scarfing these down.
Feel like you need sides? Slice up a cup of watermelon or pineapple for a quick dessert.
Let me know what you think.
Again, you can easily make them vegan by simply removing the chicken tender strips from the equation.
Your tacos will still be equally scrumptious.